Capture2Proposal Component Management Tool
For each page with customizable reports/dashboards in C2P, you will find a component management tool in the top left corner of the screen. This is the place you will use to select which content to view, create new content, or change sharing permissions on the content.
There are six options shown in this tool:

This is the purpose of each part of the control:
- Select/Load
- Save
- Save As
- Revert
- Item Settings
- New Item
- Select/Load: This option will show you all of the reports or dashboards that are available to you. There are also additional icons that allow you to create new content, or edit existing content, by clicking the icon in this view.
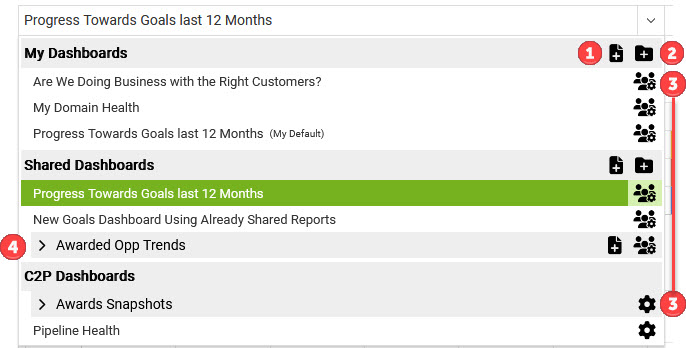
- Icons 1 & 2 allow you to create new content at the given level. Icon 1 creates a new item, while Icon 2 allows you to create a new folder to group related items in. Icon 1 is that same as icon 6 in the top level view, except that in the top level view it will default to your individual folder section, and not allow you to select the initial save location.
- Icons labeled 3 allow you to view the settings view for that item. This will open the same view as the icon in the top level view. The gear without the humans indicates that you can view the settings for that item, but you cannot modify them.
- The carrot by the number 4 above indicates that there is content with a group. Click the carrot to expand and view that content.
- While the menu is open, you can click on an item to open it, or you can hold your mouse down on a selected item to drag and drop it to a new location.
- Save: This is your standard save action, which updates the item you are working on. If this item is shared with others (i.e., a shared report), or a component in another piece (i.e., a report used in a dashboard), the save action updates the item for all of its viewers and uses.
- If you are not accessing a report from a dashboard view, AND you save changes to it, if that report that is included in one or more dashboard views you will get a pop-up indicating that this action will affect the dashboard(s). You will then have the option to choose to continue with the save, switch to "Save As" or to cancel the changes.
- Save As: This creates a new item built off of the one that was initially accessed. It will require a new name, and will not inherit the shared status of the original item; you will need to specify this after saving. Updates to each item will be completely separate moving forward. There are a couple of distinctions that are important to note here:
- If you use "Save As" to save a new report that you opened from a dashboard view, the new report will be shown in the dashboard once your report edits are complete. However, it will not replace the original report in the dashboard until you save the changes to the dashboard as well.
- If you "Save As" from the open view of a dashboard but do not have edit permissions on the dashboard, your options at the dashboard level will be to "Save As" a new dashboard, or to revert to the original report when you are done viewing. This will not delete the report you saved, it will just prevent it from being shown in that dashboard view.
- Revert: This will revert any changes and restore the item to its last saved version.
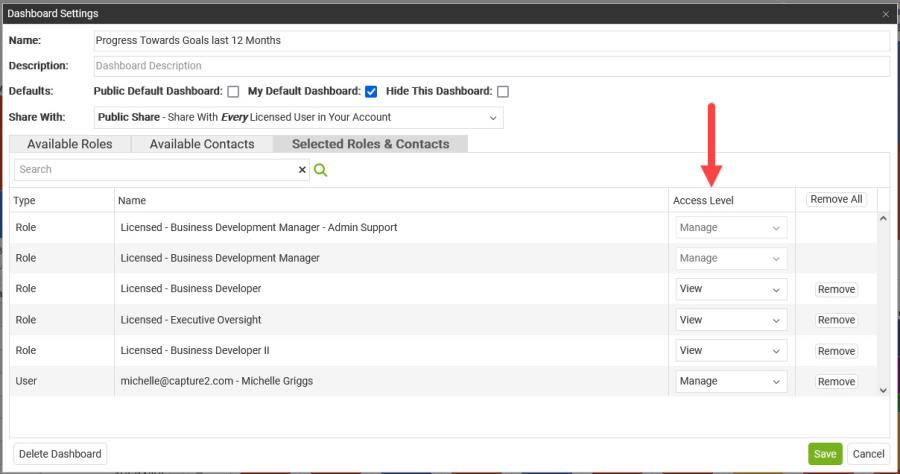
This page shows the Dashboard settings, but the same options and view are accessible in reports on both the Pipeline and Analytics pages.

- First Name the Item.
- You may add a description, but this is not required.
- The two possible defaults are mutually exclusive.
- Setting an item as your default means that is the one you will see when you open or refresh the given page.
- Any previous setting for this fiel will be removed when you save this option on a given item.
- Hiding an item will not delete it, but will prevent you from seeing it in your drop-down unless you choose to show all hidden items. Use this on shared content that you don't need to see, but that should not be deleted.
- Setting an item as your default means that is the one you will see when you open or refresh the given page.
- Go to the drop-down "Share With" and select the appropriate option.
- Private - Not Shared (My Use Only) will not allow anyone else to see the Dashboard.
- Public Share - Share With Every Licensed User in Your Account will share with all user roles who have access to the Dashboard Feature.
- Targeted Share - Share With Specific Licensed Users and/or Roles will allow you to select who sees the Dashboard either by name or role. Note that the two manager-level roles will always have access to all shared Dashboards.
- Selecting a user who does not have access to the Dashboard feature will not grant them access to view the Dashboard.
- Both the Public and Targeted Share options will give you the ability to select whether another user has View or Manage-level permissions for the shared Dashboard. You will only be allowed to edit the permissions for non-Manager roles and individual users.
- Save your changes for the new permissions to take effect.
Selecting this from the top level view will add a new item into your individual items area. You will be able to edit and save the item at this point.